Beginner's guide to modifying cars
Getting your diecast cars ready to modify isn't difficult but making them fast can be. It's a fun challenge that requires only time and few tools. You can go pro and worry about every detail, or just find a car you like and make some simple changes to see what happens.
Photos by 72_Chevy_C210

Taking your car apart
Before you can do anything, you need to take your Hot Wheels or Matchbox car apart. All you need is a drill and a few accessories.
What you'll need:
- Drill
- 3/16 drill bit
- 1/16 drill bit
Step 1: Pre-drill some pilot holes
Use a 1/16 drill bit to drill a guide hole into each rivet on the bottom of your car. You'll notice there's already a little divot there, so just drill into that. Just try to keep your drill straight. You don't have to drill in very far.
Step 2: Grind off the top of the rivet
Use the 3/16 drill bit and drill off the top of the rivet. Go slow and apply just a little bit of pressure. Stay even with the chassis and the top of the rivet will grind right off. You don't need to go down very far...just to where the plastic starts. Check frequently as you drill. Once the rivets heads are gone, your car should just pop apart.
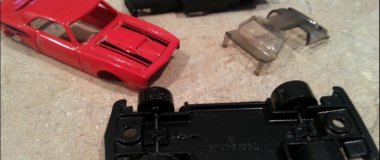
You'll get a few pieces when your car is apart, usually the chassis, body, interior and windows. And now that you have exploded your car, it's time to modify and customize. Read through some of our guides to get you started making fast cars.

Modify and customize
Now that your car is apart you can do with it as you please. You can add weight, swap out wheels and even give it a paint job. Just don't forget to test your build before you glue it together! Use some clay or putty to keep your car together while you test. It's a lot of trial-and-error before you'll find that sweet spot.
- The science of downhill racing, great video
- Swapping axles and wheels
- Custom painting your cars
- More tips & tricks, making your fast cars faster
Put your car back together
After you've made all your modifications, it's time to put your car back together. All you need is a small (and cheap) tube of epoxy to help glue things back together. You might need to fudge around find the best places to glue things back together, but in general, putting the car back together the way you took it apart is a good place to start.
What you'll need:
- JB Kwik epoxy ($5 at Home Depot)
- Toothpicks or mixing sticks
- Wax paper or small piece of cardboard
Step 1: Piece your car back together
Flip the car over and check to see if the body peg lines up with the hole from before.
Step 2: Mix up a small bit of JB Kwik
You don't need a lot and you can always mix up more. Recycle! I often use opened car blister packs as little tubs for my epoxy.
Step 3: Put the JB Kwik into the holes
Use your toothpick to pick up a some of the epoxy and drop it into the holes. You might need some elsewhere along body lines or whateer, just know that the epoxy sets within 5 minutes and hardens like metal, so don't take too long.
Or use screws
Using epoxy is a quick and easy way to get your cars back together. It works great. But what if you want to test your car while you're building? You can't use epoxy because it's permanent and you don't want to drill it out every time you make a change.
One solution is to use screws...very tiny screws. You can drill into the chassis posts and then use tiny #2-56 model screws to hold your car together. It's a great solution if you take the time and have the patience. It can be tricky. But it makes it very easy to go back into your car and make changes. Plus, I'd argue it's more reliable than epoxy.
Check out this guide for using screws. It does't require any special tools, just some very tiny screws that you can order easily.
And there you go...you've just cracked open a car and put it back together. Obviously, there's a lot of action that happens between opening and closing but working with Hot Wheels is very accessible. Not to mention you don't need a lot of special tools to start playing.
And don't forget to share your fun! Post build journals of your cars with photos, thoughts, videos and show everyone your process. You'll get ideas and inspire others...including the competition.
Discussion
You can do screws...very tiny screws. Check out this guide on using screws.
But hot glue...I wouldn't use it for anything you need permament. Hot glue can be good for quick tests and trials, but not for primetime.
I'd also recommend checking out The Archive where you'll find a lot of collections/tags for articles. Lots of good stuff available to read.


Can hot glue or a screw be used to put the car back together?