
How to: Drilling/tapping posts for screws
The conversation of fixing the body to the chassis when finished with your build has come up quite a few times around here, most recently in the Rookie Rally thread and, thankfully, its come to my attention that I wasnt the only one frustrated by trying to drill and tap, the tapping part specifically.
I was having issues until I dug out a really good handle that fit the tap nicely, but even then I was sweating breaking the tap off in the post...which inevitably happened. It WON'T happen if you're slow and deliberate, but honestly, I'm rarely those things. I was about to throw in the towel and go back to JB Welding them shut, but I wasn't quite finished with weight placement on one of the Datsuns I was putting together so I decided to try and let the screw self-tap the hole and BOOM.
I went from frustration and a 1-in-3 or -4 car failure rate to nearly 100% success. It's so stupid simple that it makes me laugh but redlinederby asked that I post up about it and I know it woulda helped me in the long run so here goes.
The SIMPLE and successful way.
1) Drill down the middle of the post with the tiny drill bit supplied in the 2-56 tap and drill kit. Dubro makes one cheap as do many many others. Most, if not all, newer castings have a little dimple in the middle of the post rivet to act as a guide which is awesome. If you're doing an older casting without it, definitely use a punch to make a guide hole. The tweak that has helped me the most with this step is to chuck the drill bit so that only a small part of it sticks out. This makes your life so much better. No more broken bits and your less likely to drill too far. Also, go slow initially. The diecast is very, very soft and doesn't need alot of speed to drill out. Go slow, then bump speed up to middle speed and you will have a quick easy hole.

2) Drill out the rivet with a bigger bit like you already do in order to remove the chassis from the body.
3) Clean up the post (if needed) by filing the top flat and making sure the body and chassis go together cleanly.
4) Drill the small hole again to make sure you have enough room for the screw to bottom out and not strip out. If you drilled far enough in Step 1 then this is not necessary but it usually is for me.

5) This is where things used to go south quick but not anymore. Instead of tapping the hole in this step, put a 2-56 screw on your driver and slowly but with a little but of pressure, turn it into the hole. The diecast is soft enough that even a non self-tapping screw will tap the hole nicely. Couple things I've learned though...having a nice handled driver will make your life so so so much easier and also, make sure the hole is drilled deep enough that the screw head bottoms out before the threaded portion which can cause it to strip out the hole.


Remove the screw and you should have a nicely tapped post

Thats it. You're done and HOPEFULLY will be far far far more succesful than before. At least I have been. This is a much better way to secure your chassis to the body than epoxy or glue as you can now test and tune, take it apart and make adjustments all you want without issue.
Hope this was helpful to those who arent already doing so or maybe tried it and got frustrated!
Matt

Discussion
Great write-up Matt! I've always done step 2 first, but I'll definiately try it your way next time!
Here are a few Amazon links for anyone who wants to get started with this:
- Me too, but sometimes you end up drilling a little further than the dimple in the rivet with the big drill bit and have to be a little more careful when centering the small bit. Drill it first and you never have that problem, the hole is already there and if you need to go further its super easy. — Mattman213
I've seen a few customizers on U-tube that use small self tapping screws, eliminating the tapping. I keep saying I'm going to try it but I have to buy them first.
- I saw the same but ended up getting regular (non self tapping) screws and the metal is so soft they tap the holes no problem. Best thing I've found for putting these things together, can't recommend it enough. — Mattman213
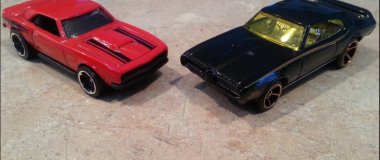
I got Matt's Datsun and flipped it over to find his screw and it looks great. Damn near factory. Looks don't matter on the bottom but just some proof in the pudding for his technique.

- Woohoo glad it made it safe. If it had been in 4 pieces when it showed up ide have to back to the drawing board! — Mattman213
I first learned to tap large metal mechanical stuff when I was younger. Learning to use a 2/56 tap waas a whole other ball game. I watch and re-watched Poochman's video on taking cars apart. I broke 2 taps from Fastners Express trying to get the hang of it. Its not that the pot metal it hard, its that the taps are thin in the middle. So it is imparative to turn a 1/4 turn cut and back up. Twist again until it barely bites and back up again. Small short cuts complete the process in seconds once you get the feel. The best taps are from Bright Vision though and screws are available even locally in some places. I get mine from Grainger or a local shop The Nut Place.
Bright Vision has a complete start-up kit also. I would recommend taking the T handle off of the tap holder. It makes it less cumbersome.
Every car I have modified since day one has been screwed together for that complete and professional look.
- A good handle and a GOOD tap is imperative for sure. Ever since realizing I can let the screw tap the hole Ive tossed the tap and never looked back! — Mattman213
I finally got some time to try again at using screws....and it worked! Funny how choosing the right drill bit size can make a difference.
And to be honest, I did use the tapper bit for a hot second in the fresh drilled hole but not deep at all. I did so just to give the screw something to bite into at the start, but after that, just some good slow force got the job done. Soft metal indeed.

Gotta say that getting this figured out changes my motivations for making more cars. Here's hoping.
What length 2-56 screw would be best for most cars?
- I use all different length and find it good to have the different lengths just in case. No telling how many times a shorter one isnt quite enough and its as simple as drilling the hole a tad deeper and tossing a longer screw in. — Mattman213
- The screws I used were really short, 1/8 to a 1/4 in length, somewhere in there. — redlinederby
- Thanks. 1/8 and 3/16 was what I was thinking. I have some with pretty short body posts, even 1/8 will be pushing it. — leasecard
Did I buy the wrong screws? I ordered the 2-56 x 3/16" stainless steel screws and they didn't work so good without the tap. Should I buy a tap or different screw? What are the best screws to get?
- Some of the longer screws seem to suck at tapping lately for me. I thought it might be my new drill bits but my shorter screws work just fine. Try to lightly wollow out the hole with the drill bit some. — Mattman213
- What size bit would be best to use? — CrazyEights
- My recent purchase was a handful of #50 bits — Mattman213
Great reading viewer reviews, well done Matt!
All these help everyone!
Being a tad old school, and born out of a workshop long ago, (almost another lifetime!) I will stick to my taps, (hard to break a habit!) but yes, you are correct with the softness of the metal, a good screw will tap in.
Cheers champ.

I've been using tap sockets for years, but I don't use a handle doing diecast cars, just roll it back n forth with fingers. You can feel when its cutting, when it isn't, and when it bottoms out.
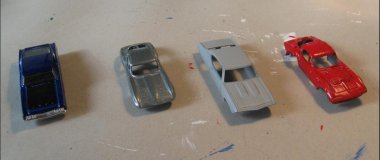
Thanks for the write-up and share...nice photos to boot.
I need to dig out my tiny screws now and try this again. Last time the tapping topic came up, I got the kit with the thread bit and everything...it did not go well. I broke the bit on the first car I tried. When they said, "go slow," they weren't kidding. Funny to think that if I had just ditched the bit, the force+screw alone would be enough. God bless soft metal and cheap manufacturing.
If I can get this working as reliably as you have, it will change my outlook on building cars. The lack of being able to test cars mid-build really soured the taste for me.