
Build Journal: City Drag
Hello, everyone! I guess it's time for me to jump in with a build journal. This is, I have to say it, literally my first build since the early 90s and back then they were plastic kits for HO scale railroading. I've got this one and another that I'm trying to get working nicely, but this one seems to be the only one working lol so it's the first one I'll be posting.
By the title, I assume you might figure out that I am calling this the city drag, for now. Once I finish it, and it will be completed, including a handful of businesses, several houses and a delightful little field that may or may not include a pond but definitely not a bridge.
Again, first DIY project since the early 90s and I am really doing a lot of this by my own consideration so there are a lot of mistakes lol

Fig 1. some Elmer's foam boards I picked up at Walmart & some angled cardboard I cut out from a delivery box.

Fig 2. cutting another set of cardboard after measuring the correct length

Fig 3. Just using some $1.25 tape to hold them temporarily.

Fig 4. Glued one side and had them held in place while drying, then in this image you can see the second side being held in place while drying. Wife didn't appreciate that I used her things lol
So first thing is I really like how it turned out with the cardboard, but I think one on each side is not going to be enough because the center inevitably will curve inward. For now that's fine, this is cheapo learning track that I will definitely be using for some competitions and in the future, perhaps, some mail-ins if I drum up the interest ;)
Second thing is using tape first is not a good idea. Later on I started putting the $1.25 glue on the pieces, putting the pieces together, then using items to hold them in place. When I tried to pull the tape off from these specific places it also pulled up some of the black part of the foam board. Not only that, but it also moved the cardboard a bit. In the future, not on this track, probably, I'll use at least three with one in the center to keep it as even as possible.
Track Information:
So I've already mentioned it's presently called 'City Drag'. That name will not remain as eventually I will name the city and give this track a suitable name. At the moment, the length is three of these foam boards which is about 90 inches. Unless my math is wrong, and it often is, that's almost exactly 1/11th of a mile. When I get around to redoing the track from the beginning, I might add a 4th board which is just a smidge over 1/8th and that sounds a lot better.
As mentioned, I intend to have a housing district, a small downtown shopping area, and a field. The starting line is at the downtown district (board 1), goes through the empty fields (board 2), and ends just shy of the last house (board 3). I am using this opportunity to truly give an attempt at numerous skills as this will all be scratch built.
There will be sidewalks at both the downtown and housing districts, with scratch built lighting in both areas, as well as scratch built buildings. The field area will be fairly empty but for grass and perhaps some cows. If I remember, I might even get electric poles in each of the three districts.
But most importantly the races run on this track will be ran at night. The street lights on districts 1 & 3, as well as any lighting in the houses & businesses will be the only light aside from any headlights/taillights added to the cars that race (I will not be attempting this until I've completed my tracks...).
Updating the track.
Well, if I am going to be rebuilding it, what of all the buildings? Easy... I'm using the sidewalk to raise the elevation of the business & housing districts, then cutting out a foundation from another piece of foam board to build on. That way, I can just pick up & move each building individually. :)
That's all for now. This is more time consuming that I thought it would be, building & waiting for glue to dry!
Discussion

Fig 1. Another thing I messed up along the way. I tried to add a median. I realized that adding a median was silly if I only did it in the residential area, and with no median in the "countryside", it was a recipe for nosense!

Fig 2. I eventually removed the median in the residential area, but did eventually add a new median in the downtown area.
 Fig 3. Adding elevation to each individual section became an issue, which I did eventually solve (more on that in a later post).

Fig 4. Now I have several problems! lol The boards didn't line up at the correct elevation, the "median" was simply going to cause chaos that I wasn't interested in having on the track, and the street lines didn't line up. Again, all of these issues are solved in the present day and I'll get around to that.
 Fig 5. I decided it was time to add a cross walk. Here is the first one, completed.
 Fig 6. Taped up for the second crosswalk.
 Fig 7. I messed up a bit of the cross walk, but otherwise I think it looks pretty good for, "I've literally never done this before!" I added a couple cars in the parking lot for the gas station / auto parts store.
 Fig 8. I cut some of the foam board (from Walmart) and painted them gray for sidewalks.
It's time to add some fencing & the beginning of a median, which will be at the first 1/3 of the track before the street light.
 Fig 1. Here is some chain link fencing I made. This is not attached, I'm just using gravity and physics to hold it up for the moment as an example so I could see what it might look like.
 Fig 2. Making more. I forget my measurements, but I checked various sources for the required height for chain link fencing in rural areas, near farms or along the empty stretches of highways in the United States then divided by 64 to get a reasonable height. I also seem to be missing what size this wire is. Either way, it's cheap wire you can buy at a Walmart in the crafts section. It's the long strips of hard wire, not the thin wire I'll be using later for trees. Unfortunately they have this green fabric around it, which I'm sure you can remove. I'm just going to use some spray paint later
 Fig 3. Ah! A surprise photo bomb of the wire I'm using, if that helps. Here I lay the completed fencing on some silver tulle that I precut. I used elmer's glue at each "joint" and along the vertical poles. You can see one is longer than the rest, and that is to put into the foam as a base. Unfortunately in later tests I realize I should've made sure that the ends also had longer poles -- but I'll get into that later.
 Fig 4. Once complete, I stuck the longer poles into holes I stabbed into the foam and glued those longer poles to place.
 Fig 5. When things align nicely.
 Fig 6. the median, which I have done nothing with since. What I did was I once again searched up county or state regulations in regards to the medians that include trees or plants, divided the numbers by 64 and measured to see if it would look good. Here I figure if we're doing 1 lane in each direction, this would be a good size. I took the required lane size and the median size into account, then with the remaining room cut a piece of foam board to size. Once I did that, I then cut out the center of the foam board, leaving a curb that extends up to just before the light. Your tax dollars at work.
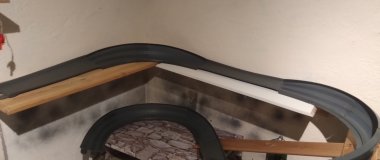
 Fig 7. The completed track, with what you can see will eventually be an issue between the first and second sections.
 Fig 8. Another issue I had to eventually deal with because of how I initially planned the descent. This does not work well as it is unstable and can change trajectory of cars between races. I eventually solved this but this is where I started lol
- I do chain link similar, only difference, I paint the supports and tulle with silver paint, allow to dry, and use solvent/thinner on a brush to melt the paint together, you can pull it tight, and tighten further even after its dried (helps fix screwups) also have made mezenines using the same method, nice job — dr_dodge
- I have no idea why I decided to do things in this order, as now I have to lay down some tape in order to spray paint the fence! I should probably have done the painting first. Can you explain the technique you use for the mezenines? — Jempire_Motors
This is the most current update. My intent is to run these "at night". I actually record them after the sun goes down, with the lights out. The only "lights" at the moment are from my cell phone which has the overhead view.
At such time that I learn how to make LEDs work, I'll have "street lamps" instead of my phone light. I do this because street racing happens at night, and cars are incredibly beautiful with the light reflections.
Here is a short video showing my RLC Lamborghini go down the track as it stands, with the angles I record from.
www.youtube.com/watch?v=iFFPs2gquR4&feature=youtu.be&ab_channel=MightyTwo
- It's a good start! If you embrace the 'spotlight' idea (with a more compressed light and/or shaped lens around your 'phone-lamp), you could imply a chasing Police helicopter overhead or something. — H3zzard
- I could mess around with that idea, as well, and have both the street lights and chasing chopper. I still have a lot of work left to do on this one in terms of scenery and such. — Jempire_Motors
I drew this up quick to illustrate the technique. I use rolls of brass wire from hobby lobby, various sizes.
Bend up the shape, solder together, (to hold in place, spike it to sacrificial wood,)
Use as long as possible pieces, little short ones are a pain to align
Paint whole structure well (vary colors if you want) Allow to dry Take painted tulle, painted structure, put tulle on and leave long overhangs. Using a paint brush with thinner, press tulle onto structure, allow to dry (usually petty quick) go to opposite end, repeat, slowly going around the whole structure, melting tulle and paint together
To pre-paint tulle, (see below for diagram)
Use a big piece of tulle, suspend from wire on top,
bend a hook wire for the bottom, and hang some weight, spraypaint and let dry (real dry!!!)
to make longer narrower holes add more weight before painting
I use different "streach sizes" and different colors to give the effect of randomness
- (this weekend I will try to make a simple one, and post actual pics) — dr_dodge
- Yeah that would be nice. I'm not sure my brain is getting this just yet lol — Jempire_Motors
 I love this look, the curbs, walkways pull this scene together well
nice work
After ... several months, including changing jobs, a few distance drives & other hobbies, back to the 'drawing board'.
Test 1
Test 2
Now that I've got the apartment to myself for a few months, I can get back to my projects, here. I'm actually kind of excited, even if my tracks don't look "professional," I'm having a lot of fun working on them. I have a huge "tournament" I'll be running on my tracks as a way of showing a proof of concept but I intend to do some wild things along the way, even if they don't look at well produced or as well built with all the scenery, yet.