
Making mountains, building up the scenery
The key component to all the YouTube-friendly tracks these days is the modeled scenery. It takes any track from just a hill for cars, to being a universe where stories can happen and details make the difference.
I have yet to take my Hot Wheels track to that next level, but I've done it with other tracks and models...and I'm sure a lot of you have too. I grew up with a model train set that got lots of world building and more recently I modeled up my slot car track.
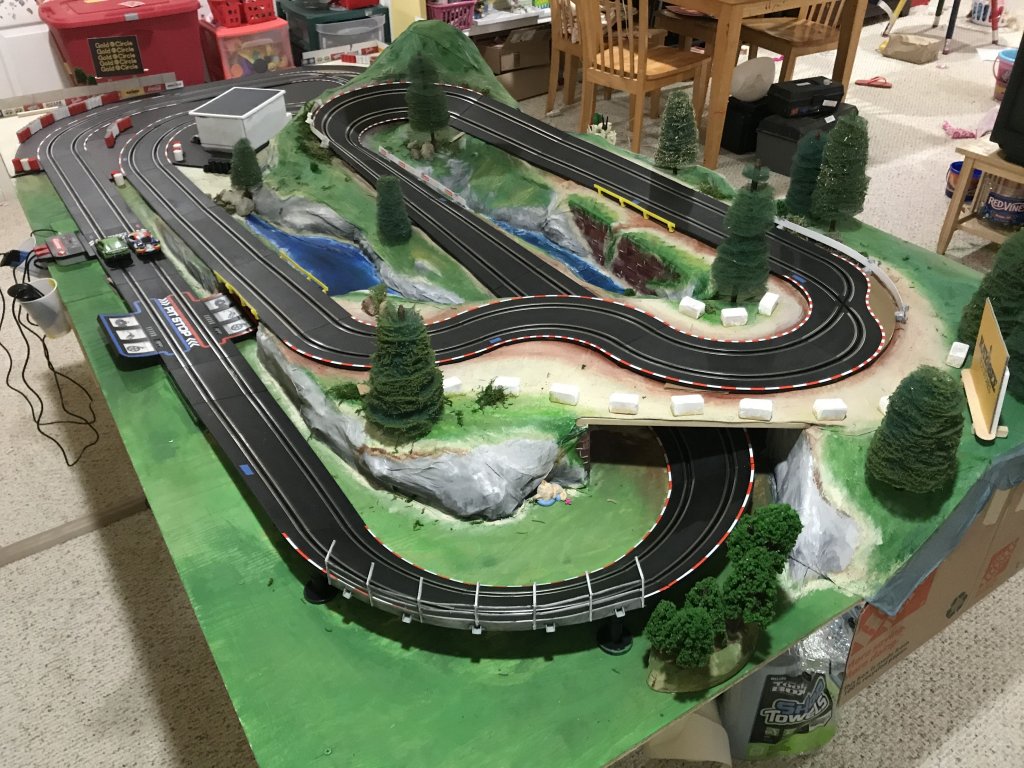
I've made 2 slot car layouts with model scenery. My slot car set is 1/43 but my model making skills are firmly in 1/64 and thus my slot car track was a bit out of whack with scale...but this isn't a story about matching scale, it's about making mountains.
My technique was something I picked up in a slot car forum. I used Blue Towel shop towels, glue, and water. The simplest of the simple...a poor man's paper mache. When I was little, my mom helped me with the newspaper strips and wheatpaste or whatever, but this is a much easier and more efficient process.
I've made a themed Spring Mountain track and a Desert Mesa track. And you can check out my Pinterest boards for more photos than those shown below...might give you some more ideas.
Making mountains
I started with trash. Quite literally...I raided the recycle bin for cardboard, styrofoam, and grocery bags to build up the regions where I wanted hills, mountains, and raised sections of track. You know that scene from Close Encounters...it felt like that.

Then it's all water and glue. Next, I took a bowl of water and mixed in plain old white glue until it felt like thick water...almost paint-like consistency. You don't need it very thick, the Blue Towels will hold it well. Just get yourself some dish washing gloves to save your skin.


I dip a towel into the bowl and get it all soaked in, then run it through my fingers to get the excess off. Then just drape the towel over your base and form as you want. No need to hurry either.
I also found that a single layer is often enough for most scenery. Double up here and there where you need some extra support but otherwise the towel is very sturdy once it dries and hardens. It holds the shape great, at which point you can start painting.
I'm not doing to tell you how to paint or anything like that...we're all after different styles and effects, so just have fun and copy something you like. Below are some pictures from my final slot car tracks. You can also check out my Pinterest for more shots.


All in all, a $10 pack of Blue Towel shop towels and a $10 gallon bottle of white glue got me enough supplies to build two 8'x4' slot car layouts with plenty of extra to spare. I can probably get 2 or 3 more tracks out of what I bought...so it's cheap.
My diecast setup right now doesn't lend itself to a lot of modeling room, plus I don't have the video capability to really take advantage of such detail, but maybe someday. Model making is a lot of fun and doesn't requite a lot of investment outside of time. It's something I did a lot when I was a kid with my train set and then didn't do for decades...I had forgotten how much fun it was.
How do you build?
What are you techniques for model making with your diecast track? Share your photos and ideas. With all the fat track being made for channels, it's something we can all get inspired by.
And don't forget to check out the Track Directory to see how others have built their racing worlds.
Discussion
Awesome man! That is next on my list and that's the kind of way I was planning/hoping to do it but great to see the detailed description of it. I've been hoarding so much rubbish and scarps recently for exactly that reason ????
- Totally...you never know what can make a nice little detail. I hoard cardboard...and every little box or bottle. You never know what can give you good shapes or supports. — redlinederby
I have access to all my Father in Law's molds and notes...once we get settled on the lake and retire I'll have all my tracks setup and will take everything to the next level...my Father in Law is one of the best diorama and scene makers I know 

Fantastic on the blue towels and super cheap....great, so probably for $100 or so in towels I can do the entire wall of my garage for Widowmaker Run! I just need to decide if I want to give up all that space or not.....easy decision...YES! I probably won't get started on doing scenery for 6 months or so until I get everything worked out 100% and have all my camera angles and mounts finalized. But It's going to be one of the largest permanent tracks in the world. Subscribe to my channel and take the journey with me.
This is Widowmaker since 2017...1st turn of the Reaper's Switchback on Bootleg Run 
Oops....now there are 2 tracks with the same name I guess. I already made a giant 29" x 29" inch poster and 200 stickers of my logo, so I am not changing the name. You will need to look at my track profile for the pictures or go here for video: Widowmaker Run on Youtube (2020 track)
- No worries...think it's great — LeagueofSpeed
- Track is Bootleg Run and the curve is Widowmaker — LeagueofSpeed
- Bootleg Run is in the Redline Derby Track Directory — LeagueofSpeed
I've never done any modelling or dioramas before but, encouraged by redlinederby's post at the top of this thread, I've had a go, and am quite pleased with the results.

As I am a beginner I got a Woodland Scenics mountain diorama kit (which contains some plaster and rock moulds and other bits and pieces), an extra bag of grass (!) and some earthy coloured brown paint. The structure is just a double layer cardboard base, a couple of cardboard walls, and balls of newspaper. I used sheets of A4 paper dunked in a 50/50 pva glue and water mix. The modelling "grass" which i think is ground up, dyed foam (you spray pva/water and sprinkle it on) adds a lot to the realism.

Only problem I had is that the cardboard bases have curled slightly as things have dried (despite laying two sheets with the corrugation at 90 degrees) so if I was doing it again i'd use something stiffer as a base, but cardboard was all i had available during lockdown.

Also found some model railway drystone walls on ebay which go together like jigsaw pieces. Glued onto a plank they act as track guides and are perfect for that British country road vibe! Used a Woodland Scenics road striping pen (and some careful measuring) to add a UK style centreline too.

The piece de la resistance is the mountain top car park. Same techniques plus some fine wet and dry sandpaper for the tarmac.

Only problem is I have no idea how I'm going to store all these scenery boards when the track is down! I've somewhat undermined my easy to put away ethos!
- thats really cool. Good track, Great Scenery. — madmax
- Try putting the 50/50 PVA/Water mix on the bottom of the cardboard. It should help to straighten it out. I've made flock(grass) from sawdust. Mix it with water & paint, let dry, then sift through it. Your track looks good. The scenery makes it pop. — Blipside
- Awesome track! — SuperLos
WOW! That's awesome! And I absolutely love the fact that you have your diorama showing with your regular living room furniture. There's something quite magical about that juxtoposition. Like the racing elves come out to race when the humans aren't around.
It looks sharp...keep it up. Storage is always an issue for me too, and always the last thing I think about. Whoops.
That is awesome! I love it.
For storage, build a rack unit where you have little runners on the sides that each scenery piece can slide onto and have them spaced apart enough, height wise, for each piece (so they all have a space allocated to that one piece) - kind of like oven trays etc. That should work and could fit in a cupboard.
Would love to feature this in the DSPN report at some stage if you're interested.
- Haven't filmed any races yet, but maybe. One step at a time! — EcuWeeEcosse
- Don’t need video, could even just use these photos for now if you’re ok with that? — Chaos_Canyon
- Might have a first try at taking some video this weekend, so will get back to you. — EcuWeeEcosse
Just one detail lets it down as a British Diorama, there is no Kevin and Barry with their Novas anywhere! lol
Looks great, I love it. How many of the Woodland Scenics kits did you use for the landscape? It really does look awesome.
- I just bought the one kit as I wasn't sure what to buy. It has rock moulds, a few little bags of different grass, the little bushes (clump foliage) and tiny pots of paints for rocks and earth. It will do one diorama about 40cm across. The main value for me was in the step by step instruction leaflet as i lacked confidence. Once you know what you are doing it will be more economical to buy stuff individually in larger quantities, or make your own. There is loads of info, videos etc out there from the model trains and wargaming guys. Its a bigger rabbit hole than diecast racing! — EcuWeeEcosse
- Pete is not referring to Chevy Novas by the way. Google Vauxhall Nova for those unfamiliar with bad British cars of the 1980s. I doubt they ever made a Hot Wheels or even a Matchbox version. — EcuWeeEcosse
Great info and some great tracks!!!!
Slot car racing,my other hobby!!