
New axle holder, 3D printed with screws
Ok, so for ages I've been thinking about if it would be possible/better to screww axles in so that I could change them easily if they got damaged or I wanted a different look etc. I recently purchased this sweet Lincoln Continental cop car that was beat up and the axles were stuffed. I pulled it apart and added some rust details to the paint as I loved the look as it was and pulled the axles.

Having just got a 3D printer for Xmas I decided to print a couple little axle holders and try my theory. Now, during testing there were a few issues and while I was removing one of them I accidentally broke the chassis as well, so the front had to have a custom block printed for it as well, to fill the gap - it's not quite square but that doesn't effect the handling at that point as it's just the grille is slightly off on one side but not a real issue.
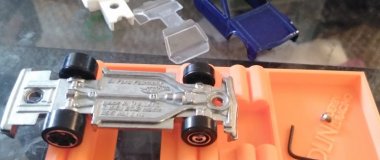
You can see in the photos below the two screws that go into the block and there is a 0.8mm hole drilled for the axles, which are just cut off pins. The system is working great so far and I'm really happy with it. The drawback at this point is that you can't use a full axle set with it (as there is no way to add the axle without cutting it first) but I have another design that I'm working on currently for another car so will see how that one goes.
The other reason I like this set up is that it stops the axles wandering side to side and yet leaves it ultimately adjustable/changable as opposed to gluing it in place. Anyone else tried anything like this?


Discussion
Looking at your setup, I would say that a relatively easy fix would be to turn the block 90* to place the screws in line front to back instead of side by side. This would allow the full axle to pass between the screws and be held down securely by the top block. If you wanted to go totally nuts with your printer, you could also simply (?) print out an entirely new chassis - I know a few people over at the Gaslands site are doing that with the BoneShaker chassis to fit larger wheels.
That is some awesome patina!
- The block is a solid piece currently so the screws are actually what's holding the pin axles in place but the other one I'm working on is a two piece version and the screws would be front and back for that :) — Chaos_Canyon
- I was thinking of the Gaslands straps version, too. Also, if you do front-to-back orientation with the screws, you might then consider shifting to smaller eye-glasses screws so that the printed part can take up less space. — GenX_VintageRacing
- Goosd point on the screws - I'm just using what I have on hand, which is what I screws the bases on with, but ideally they would be better with grub screws, take up less space etc. — Chaos_Canyon
This is all so cool to see what others are doing or have already done in the diecast modding world! I have so much to learn! Thanks for sharing!
It's been on my idea list to try and print out a longer, flat axle holder kind of like the Matchbox metal one. One hurdle I hit was just the difference in chassis size/shape...I'd almost have to design an axle holder for each new car. I was hoping for a universal thing but that's probably wishful thinking...but it never got beyond my sketchbook anyway.
- Also, you'll be having fun with that 3D printer! If you got the means, talent, and time to design parts, you'll be crusin' — redlinederby
- My design skills are super basic currently. Been wanting one of these for years so now I'm printing stuff like crazy now :) Got a good number of figures as extras now, just need to paint them all lol — Chaos_Canyon
- Ditto. I've been using Tinkercad for modeling and it's served me well. — redlinederby
You are definitely on to something here. I'll be keeping an eye on this post and am excited to see what y'all come up with. I work in an artistic field for my day to day and I love the creativity and enthusiasm of the diecast community. Im Really glad to be a part of it.
Ok, so they are working awesomely on this car! I had an issue after a heavy accident that bent one of the pin axles so I simply unscrewed the base undid that axle, cut a new pin, put it all back together and it's flying again. Exactly how I wanted it to work.
For the full axle swaps I came up with the below version that basically snaps together and the screws work to lock it into place. I left a bit more wiggle room in the axle slot so you could make sure you get it perfectly aligned and this is also working great on the rear axle. So now I'm going to try it on the front - it'll have to be trimmed around a bit more as the gap at the front is a bit shorter but a quick trim with a saw/knife should be pretty easy. The one change I'll make to this design is to lower the thickness of the base. It would be fine if the car normally rode high but this is in a car that is already super low so that extra mm meant the wheel almost touch the body. Again, an easyish fix, just sanded it down, but if I was remaking it, thats what I'd do to it. currently it's 1mm deep at it's thinnest and I'd drop that to .5mm. As I keep working on it I'll post some more updates. But that rear axle holder is perfect!
If I can get my 3D crafting skills up I might even try printing an entire base to see how that goes :)

- Such a great idea! Thanks for sharing! — G4DiecastRacing
- So it's just a clamp, basically. I wonder if there's a common, minimal width that would fit in most cars, or if there's enough variance in chassis molding to require custom thickness/width each time. Hmmm... — redlinederby
- I'm assuming you didn't make the screw hole threaded at all? Given how thin it is...but I also assume the screw bites the plastic pretty well. — redlinederby
- Yes, just a clamp system. I've found that the 7mm width is fine for pretty much every car I've looked at as they all have that gap for the current wheel holders. Some are much wider but as a minimum this seems to work well. No, didn't thread the holes in the print, literally just drilled the holes then put the screws into it and it seems to work fine. Printed them at 100% infill to give me the best bite I could. Technically you could just use two flat pieces of styrene to achieve the same thing, but I like the locking method of the T shape, makes it much easier when aligning everything. The only thing I've had to trim was the base thickness (but will change that in my next round of printing) and then cut off some excess at the front of the Torino one, so it didn't cover the post/hole at the front. other than that used the same one at both ends of the car and it's golden. — Chaos_Canyon
- There you go. That's what I was talking about doing. Glad it's working well. — SpyDude
If you want to see this car in action, check out this episode of my Canyon Outlaws and how it stacks up against other custom builders. Gotta say, I'm very happy with the performace so far :)
When I started modding I tried screws and washers for the same effect but has mixed results at best. I love the idea and don't doubt that someone will dial it in some in the future.
Matt