
Ya gotta start somewhere, a checklist for modding
So I had a friend ask, “How do you prep a car for racing? What tools do you use?” I sat here and thought about it for a while, and decided to type up a list of what I use to build a car from start to finish. (Let’s assume you’re just drilling the car, swapping/working the wheels, adding weights, and putting it back together, original paint and axles.)
As a complete rookie, this is what I have learned through numerous videos, reading articles, and asking a LOT of questions from more experienced racers. This is the basics of what I do and use for a new build, straight out of the package to completion. Most of these tools can be found at Harbor Freight, Home Depot, or on Amazon at reasonable prices.
Removing the body
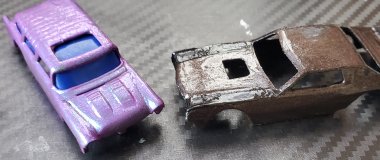
I personally use a DeWalt cordless drill with a lithium-ion battery pack and a 3/16” metal drill bit. This allows me to take the entire head off the rivet quickly and easily. For plastic bodied cars, I use a 3/16” bit in a T handle - a few quick twists and the body is off the chassis. Also, on metal. bodies, I like to gently round off and de-burr the posts with a grinder bit in my Dremel, as those posts are sharp after drilling.
Removing the axles
On a plastic chassis, I use an xacto knife to cut the single tab on each axle, leaving the other two intact. I can usually just wiggle the axles out from underneath at that point. On a metal chassis, I have used a set of wire cutters (also known as side-cutters) to clip the single tab on each axle. I have also used a dremel with a small grinder bit for more stubborn axles.
Working the wheels
Even if I’m swapping wheel sets from one car to another, I do this to prep the wheels. Before I pop the axles out of the chassis, I drag my fingernail over the surface of each wheel while slowly turning it. As the wheels are all made in a mold, there is a mold line on the surface of the wheel which will catch your fingernail (this is why the cars will occasionally rumble when you roll them). I use a jewelers round file perpendicular to the tread of the wheel, and gently rub back and forth over that area until it smoothed out, rubbing in the direction of the tread. After that, I use various grades of sandpaper cut on thin strips and wrapped around my fingertip, and go back and forth over the spot where the ridge was until I can no longer feel the ridge. Remember: fast cars run smooth and quiet. If your car sounds like a marble rolling across a granite countertop, you got some good stuff right there. Also, check the wheel hubs where they rub against the chassis. These are often out of round, and can be repaired by lightly dragging a file over them as you turn the wheel by hand.
Polishing the axles
I use a polishing pad on my Dremel, and automotive polishing compound (Meguiar’s) to polish the axles. I hold the wheels in one hand, dip the end of the axle into the polishing compound, then circle the axle several times in either direction with the polishing pad. Obviously, I do this four times, once for each end of both axles.
Prepping the chassis
When the chassis comes out of the mold, it occasionally leaves seam marks right behind the wheels - this is bad for a racer, as it will cause the wheel hubs to drag. I use a flat jewelers file to file that area down nice and smooth.
Aligning the wheels
I use RedlineDerby’s axle alignment jig and E6000 to secure my axles inside the chassis. E6000 goes on as a gel, and is strong enough to hold everything in place, yet is also flexible enough for you to be able to remove and replace the axles in case of a major accident. I like to use a rubber band looped around the bottom of the chassis and around the alignment jig once I have the chassis and wheels set in place to make sure nothing moves during the glue curing process.
Car interior
Many cars have molded interiors, which looks great as cars to play with, but not so great if you need to add weight. Also, more often than not, the interiors press down on top of the axles to help keep them in place, so simply doing away with the interior is often a difficult decision. I use a jewelers saw with a thin blade to cut away non-essential parts of the interior - pretty much anything that does NOT hold the wheels in - to make room for weights. Again, E6000 gets used for adding weights (especially if you take the car apart and want to re-use the weights on a different car). The Windows also get painted black or some dark color from the inside to hide the lack of interior. For precise weighing, I use a jewelers scale that measures to a tenth of a gram.
Lubing the wheels
I start by spraying Teflon coating into a small glass bottle, then using an eye dropper to place a drop of Teflon on each axle. I give the wheels a decent spin, flip the car over, and apply another drop between the wheel and the chassis and let it dry. Once the Teflon coating has dried on the axles, I tap a little graphite into the end of each wheel and work it around with a small paintbrush, as well as the spaces between wheel and chassis. What I personally like to do after this is to gently tap each wheel with the polishing pad on my Dremel, giving it a good hard spin to help work the graphite into the wheel as a ‘break-in.’ I do this about three times per wheel: graphite, brush, tap, rinse and repeat. During testing, I simply tape the car together with Scotch tape.
Finishing the car
Some people are using small drills and a tap set to put screws into the posts of their cars, fastening then with 2-56 screws. I have not yet felt confident enough to try this technique, so I fall back on using E6000 in a line down the edges of the chassis and on each post, then pressing the car together and securing with a rubber band. After wiping off any excess glue and checking to make sure nothing has touched the wheels, I set the car aside for a couple of days to let the glue fully cure. At this point, the car is basically finished and ready to be shipped out.
Shipping
For shipping, I like to fasten a couple of stacked popsicle sticks or strips of coroplast along the length of the chassis between the wheels to act as a buffer. The reason for this is that any impacts to the packaging will be distributed through the harder shell of the body and chassis, rather than the fragile wheels and axles. Tape the buffer underneath the car for shipping, and the host can remove it on site for racing. (For shipping my roadster pickup for the Sock Hop Slam. I used a coroplast buffer between the wheels, wrapped it in bubble wrap, then stuffed it inside a Tic Tac container, which is just long enough to hold a Hot Wheels car securely.)

Discussion
Thanks for sharing your build routine! It's great to see the process written out like that. I think many folks hear about building Hot Wheels and think it's just opening it, adding weight, and then closing it...not the case!
And great idea on the Tic Tac container. I thought it was really cool to see that get used with your Pro-Am entry. It's the perfect size for most cars.
This is definitely a great list to start along with other topics of old about how to "add speed" to our builds.
- I wanted to make sure that people not only knew what I was doing to the car, but what tools I was using, too, so they could get them if needed. — SpyDude
- And yeah, the Tic Tac container was one of those spur-of-the-moment things that I had on the corner of my desk. Since I knew the top side of the truck was semi-fragile, I wanted to protect it more in shipping. I happened to look over at the container and was like, "Hmmmm...." And it worked! — SpyDude
Now, to be fair here, I am also one of those builders without a test track. I have a total of twenty-four inches on my desk to test cars I have built, I do not have a timing system, nor do I have the real estate to put up a test or permanent track. I simply have to go with how the car sounds and how it moves across those twenty-four inches of open space in front of my keyboard, so for now I am currently stuck in "rookie" mode for building and testing. However, if you check out my stats here on RLD, those twenty-four inches of space have produced a couple of winners and a few top five finishes.
Work with what you have until you can get better, but most importantly, have fun while you are doing it.
Another good shipping setup is the dollar crayon cases from Walmart.... assuming you don't have the filled with magic decks lol
Thank you so much for this. I just fell into this rabbit hole and this was extremely helpful.
Have you tried anything besides E6000? I use the two part epoxy and I have never tried the E6000.